Bandstop filtering
Added in firmware version v1.2.0 - see firmware page for how to update.
The WOLFWAVE has 10 individually adjustable stopbands, which can be used to block out interfering signals that cannot be eliminated using the bandpass filter (for example, if they are in the middle of the desired SSB signal). Each stopband can be toggled on or off, and the centre frequency and width adjusted.
Bandstop screen
The parameters of each stopband can be adjusted from the bandstop screen. To access this, start from the bandpass filtering screen shown when the WOLFWAVE powers on, and press the mode button repeatedly until the bandstop screen is shown.
The controls in the bandstop screen are very similar to those used in the menu. Turn the multi use knob to change which setting is selected. Then press the multi use knob to start or stop editing that setting. In edit mode, turn the knob to adjust the value of the current setting.
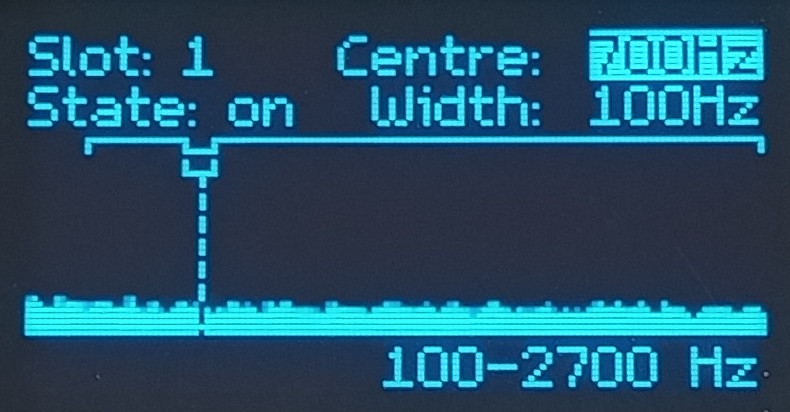
The settings for the currently selected stopband are displayed at the top of the screen:
- Slot: which stopband is currently being adjusted. Change this to switch between stopbands.
- State: toggle the stopband on or off
- Centre: the frequency on which the stopband is centred. If using a stopband to notch out a single signal, this should normally be set to the frequency of the interfering signal. This is displayed on the spectrum with a dashed vertical line.
- Width: width of the stopband. This is the approximate distance between -3dB points. For best results, this should be at least 100Hz. Narrower widths will give poorer attenuation at the centre frequency.
Below the settings text is a spectrum display showing the input signal. At the top of the spectrum display, there is a visual representation of the currently selected stopband, and of the filter shape resulting from the current bandpass and enabled bandstop settings combined.
The text below the spectrum indicates the horizontal range of the spectrum. This will automatically change to fit the upper edge of the passband.
Menu settings
There is also a bandstop section in the menu:
- Bandstop filtering: enable or disable all bandstop filtering. If enabled, the on/off settings for individual stopbands are used. If disabled, all stopbands act as though turned off and have no effect on filtering.
- Quick toggle: shows a summary of stopband settings. Pressing the mode button or the multi use knob in this submenu toggles the highlighted stopband on or off.
- Load defaults: reset the stopband settings to the default values used at power on.
- Save defaults: save the current stopband settings to be used as the new power on defaults.
- Factory reset: reset the stopband settings to the original values the WOLFWAVE was supplied with. Note that these are not automatically saved as the new power on defaults, "Save defaults" must be used afterwards to do that.
Note that the save/load/reset items do not affect the main bandstop filtering toggle, only the stopband settings. To save all settings including the main bandstop filtering toggle, go back to the main menu, then use "Other settings > Save defaults".
Notes
The number of stopbands enabled does not alter the latency or significantly change the power consumption of the WOLFWAVE.